

Saniflo Installation Made Simple
Installing a Saniflo isn’t quite the same as fitting standard plumbing. These systems rely on maceration and pumping, which means small mistakes during a saniflo installation can quickly lead to blockages, smells, noise, or even a broken unit.
At Pumpmaster, our approved Saniflo engineers fix these issues every day – but by following the 10 golden rules below, you can avoid common problems and make sure your Saniflo runs smoothly, keeps its warranty valid, and lasts much longer.
For a full step-by-step overview, see our Saniflo Installation Guide
The 10 Golden Rules of Saniflo Installation
These 10 golden rules cover the core principles of a correct Saniflo installation, ensuring it efficiently serves your home or commercial space. For more detailed instructions, refer to the manufacturer’s guidelines or consult a qualified plumber specialising in Saniflo systems.
1. Choose the Right Pipework for your Saniflo installation
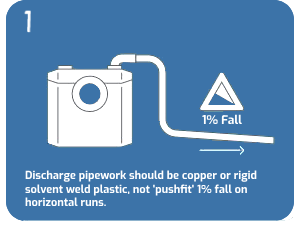
Always use copper or rigid solvent-weld plastic for your discharge pipework – never ‘push-fit’. Push-fit joints can come apart under pressure, leading to leaks and damage. Horizontal runs should also be laid with at least a 1% fall for optimal performance.
Put simply: you do not want your discharge pipework blowing apart. Using the right materials from the start avoids one of the most common causes of a blocked Saniflo.
2. Optimise Gradients
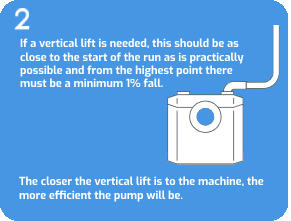
Give your pump a break – let it do all the hard work at the beginning of the run. Always place the vertical lift as close to the Saniflo as possible. This ensures the pump tackles the most demanding part first, improving efficiency and reducing strain on the motor. From the highest point, keep a minimum 1% fall on all horizontal pipework.
Following this rule will extend the life of your Saniflo and reduce the chances of future breakdowns. For more help, see our Saniflo troubleshooting guide.
3. Smooth Out Bends
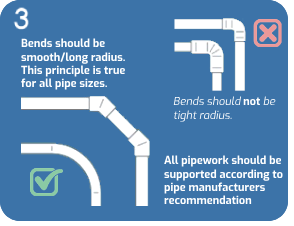
Let’s keep it smooth – it’s more efficient that way. Always use long-radius bends rather than tight elbows, and make sure all pipework is properly clipped. Loose or unsupported pipes can rattle, dip, and collect waste, leading to blockages or noise issues. Supporting the pipes as per the manufacturer’s instructions will keep everything flowing as it should.
If your unit is already rattling or struggling, check our Saniflo troubleshooting guide for solutions.
4. Align Entry Pipes
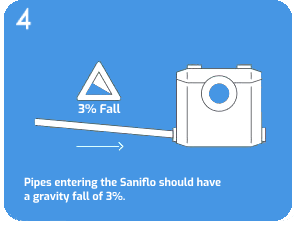
The basic principle of plumbing still applies – always work with gravity. Any pipes entering the Saniflo should have a gravity fall of at least 3%. This ensures waste flows smoothly into the unit, preventing backflow, noise, and unnecessary strain on the pump.
Problems with incorrect falls can often show up as noisy Saniflo units
5. Correct Pipe Sizes Matter

Use the correct discharge pipe size for the Saniflo model and installation. Where the discharge pipe drops vertically by more than 1 metre, an air admittance valve may be required at the highest point. Increasing the pipe diameter on the downward section can sometimes remove the need for one.
6. Maintain Accessibility
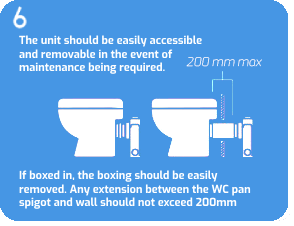
Common sense really – do you want to call out a carpenter, a tiler, and a plumber just to access your Saniflo? Always make sure the unit is easily removable for maintenance. If it’s boxed in, the boxing should be simple to take apart. Keep the extension between the WC pan spigot and the wall under 200mm – anything longer risks blockages and weak flush performance.
Accessibility saves you money on future repairs and keeps your system compliant. For a maintenance checklist, see our macerator repairs guide.
7. Separate Discharge pipes
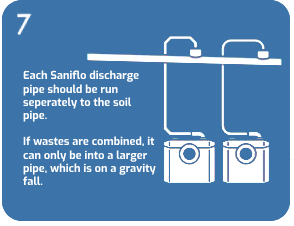
It’s a question of congestion – let’s not form a “log jam”. Each Saniflo should ideally have its own discharge pipe running to the soil stack. If multiple wastes must combine, they should enter a larger pipe on a gravity fall, not into another Saniflo discharge line. This prevents blockages, backflow, and pump strain.
If you’ve already got recurring blockages, see our guide: Why Your Saniflo Keeps Blocking.
8. Secure the Unit Properly

You do not want a wobbly cistern – a simple baton will remedy that. Always ensure the Saniflo is securely fixed in place, especially with close-coupled WC suites. Battening the cistern slightly off the wall can also create the space needed for the Saniflo without compromising stability. A secure unit prevents movement, leaks, and long-term wear on the pipework.
If your installation feels unstable or noisy, our Saniflo engineer advice explains what to check
9. Positioning Matters

Avoid siphoning, avoid smells, avoid flooding. The Saniflo should always be positioned behind the toilet, never beneath it. This setup ensures waste enters the unit efficiently and reduces the risk of backflow or pump strain. Proper positioning is one of the simplest but most important steps for a reliable installation.
For more on preventing performance issues, see our Saniflo troubleshooting guide
10. Ensure Correct Connection

Domestic Saniflo macerators should be connected via an unswitched fixed wiring connector with a 5 amp fuse.
The unswitched connection helps prevent the unit being accidentally isolated or switched off during normal use, while the fused connection provides the correct electrical protection for the domestic range.
For professional models, always follow the specific wiring instructions in the manual.
👉 Unsure about your setup? Our local Saniflo engineers can check the installation for you.
F.A.Q.
Frequently Asked Questions
Can I carry out a saniflo installation myself, or should I hire a professional plumber?
While DIY saniflo installation is possible, we strongly recommend hiring a professional plumber to ensure a seamless setup and optimal performance.
What types of pipework are suitable for Saniflo units?
Always use copper or rigid solvent weld plastic for discharge pipework. Avoid push-fit connections, as they can blow apart under pressure and cause leaks or blockages.
How can I optimise the performance of my Saniflo unit?
Optimize performance by placing vertical lifts close to the run’s start, using smooth, long-radius bends, and ensuring correct pipe sizes and secure positioning.
Is it necessary to hire a plumber for routine maintenance, or can I do it myself?
Routine maintenance is essential as without it, you risk smells, blockages, and reduced lifespan. You can carry out simple care like descaling your Saniflo yourself, but for full servicing or repairs it’s best to use an approved Saniflo engineer.
What precautions should I take during winter to prevent Saniflo issues?
Cold weather can damage pipework and pumps. Insulate external pipes, keep the room at a steady temperature, and clear drains if frost is expected. Read our Saniflo freezing tipsf or full protection.
Can I use Saniflo units in commercial spaces, and are there specific installation considerations?
Yes – Saniflo systems are widely used in offices, shops, and even specialist projects like our luxury ship case study.
The same saniflo installation rules apply, but accessibility and maintenance are even more important in high-traffic settings.
Warranty Reminder
Following these golden rules and correct usage helps keep your warranty valid.
Register your Saniflo warranty here: sfasaniflo.co.uk/en/register-your-saniflo-warranty